
For years, 24 fps has been the universal standard of digital cinema. While a handful of vendors have supported alternative frame rates, full support still eluded some of the top D-Cinema server manufacturers. Lately, things are looking better for alternative frame rate content as more vendors update their systems to support a broader range of frame rates and the new SMPTE standard for DCPs.
Of course, there are still a few stragglers and institutions like the Academy of Motion Picture Arts and Sciences that mandate 24 fps for qualifying DCPs. So what do you do when you need some serious frame rate conversion?
*For the purposes of this post, we will be talking in terms of drop frame frame rates because that’s how must of us edit and post.
Frame-Rate Conversion
The goal of converting video between frame rates is to maintain the same total run time while conforming to a different technical standard. To do so, we need to remove or add frames to match the new frame rate. Doing a straight export out of your editing bay between frame rates will result in dropped frames or dupe frames that will cause your image to stutter. We avoid this by using one or a combination of frame blend conversion processes.
Why can’t I just change the frame rate setting on export?
Most editing systems use unintelligent frame rate conversion mechanisms when doing a frame rate conversion on export, either dropping or replicating frames to make up the difference in your image. This can result in stuttering images that can ruin a picture. When looking for a conversion method, pay close attention for tools that can perform motion compensated or motion predictive frame blending.
Hardware Conversion Tools
BlackMagic Design’s Teranex – Easily one of the most recognizable conversion tools on the market, the Teranex interfaces directly with NLEs to provide a highly effective toolset for conversion, de-interlacing, and pulldown removal. It can’t handle everything though, so use it in combination with software tools to achieve the best results.
Quantel’s Alchemist – This machine has stood as the authority in frame rate conversion since its introduction in the early 90s. This one is meant for straight conversion of signal for broadcast environments and is not as useful in a post production environment. A very quick and easy solution, but be sure to check your end product carefully.
Software Tools
Software tools can get you most of the way towards converting the frame rate of your film, but require care and precision. While we cannot provide detailed tutorials, there are a lot of great resources on the web to teach you how to effectively convert your film for little to no cost.
Cinnafilm Tachyon – GPU-accelerated frame rate conversion allows the Tachyon to converting frame rates far faster than real time. Geared toward post production teams in broadcast environments. Simple DCP uses Tachyon for frame rate conversion.
RevisionFX Twixtor – A staple in post-production for ultra-slow motion effects, Twixtor is a very effective frame rate conversion tool. Using motion compensation algorithms, Twixtor predicts and interpolates your image to make sure every frame flows smoothly into the next. Twixtor works across multiple platforms and software toolsets from Adobe Creative Suite to FCPX.
Apple’s Compressor – Unbeknownst to most Final Cut users, Compressor has included a very powerful frame rate conversion toolset right under the hood for years now. Using the frame controls tab in Compressor 3 (now built into the conventional workflow in Compressor 4), you can take advantage of either a simple motion blur translation (Good Quality) Motion Compensated Frame Blend (Better Quality) or Optical Flow (Best Quality) which works in similar fashion to Twixtor. If you have shots containing pulldown, you can also use the Reverse Telecine function to automatically detect and remove it. Your results may vary so be sure to inspect your project thoroughly.
Final Cut Pro X – Documentation for FCPX’s built in frame blending tools is geared primarily at those looking to apply retiming effects like slo-mo and time lapses to their projects. It also serves as a great tool for converting frame rates easily and effectively right inside of your editing timeline. Use the same options available to you inside of Compressor to achieve hardware quality conversions prior to output and skip the extra post production steps down the line.
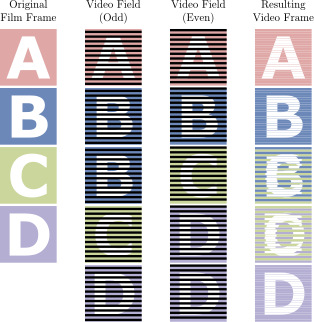
Interlaced Video
Broadcast video is often shot with interlaced fields (two combed images that together form a single frame). When converting, it’s important to perform the progressive conversion at the same time as your frame rate conversion to achieve the best results and your conversion will work directly from your interlaced video’s fields rather than just the frames themselves. This allows for a much more fluid interpolation of frames and yields significantly better results.
Reverse Telecine
The one caveat to progressive conversion is when your interlaced image has been achieved via telecine. Telecine is the process of conforming film content for broadcast. Unlike frame rate conversion, pulldown is a non-destructive process that adds new frames to video by recombining existing frames by way of fields. For more info on pulldown, check out Apple’s documentation for Cinema Tools.
Because pulldown is non-destructive, you can actually reconform your project back to 23.976 without losing any image quality. The key is to perform a Reverse Telecine on your footage. Most hardware and software frame rate conversion tools have this ability, but our favorite is Apple’s Compressor, which can automatically determine your specific pulldown cadence and remove it. This becomes significantly trickier, however, when you’ve already cut together a project using footage that has gone through a a telecine and may require your film to be re-onlined.
Frame Rate Conforming
Conforming is the process of speeding up or slowing down footage to match a frame rate. This is most commonly performed when going between drop and non-drop frame rates.
23.976 fps –> 24 fps (.1% change)
While subtle, these effects can have an impact over time. If audio is not resampled, for instance, to reflect the new timebase, it will begin to drift. In the case of 23.976 fps to 24 fps conversion, audio will drift at a rate of approximately 1 second for every twenty minutes of video.
Conforming 25 fps to 24 fps
Converting 25 fps material to 24 fps is exceedingly problematic. In order to smooth out the single dropped frame across your project, frame rate conversion engines have to interpolate the difference across each and every second you have, resulting in streaked, inaccurate frame blends. For this reason, instead of converting your film, we instead recommend conforming. The only problem with this…
25 fps –> 24 fps (4% change)
There is a noticeable pitch shift in audio when when changing the timebase so drastically. Most people viewing your film for the first time will be none the wiser, but where it becomes extremely noticeable is during sound cues. In this instance a filmmaker can either opt to retime sound cues to the new conformed frame rate or opt to apply a pitch shift filter to their soundtrack. You can find an easily accessible filter in Adobe Audition.
Professional Conversion
Many projects require additional attention to detail if your project contains any of the following:
- Inconsistent source material
- Mixed frame rates
- Baked in interlacing artifacts
- Fast pans
- Lower thirds or other graphic overlays
You may be best served by seeking out the assistance of a facility specializing in onlining and conforming.